Area/surface measurement tool

Assign the area tool to either one of the mouse buttons. You can now draw a contour by holding/pressing the mouse button
down and draw by moving the mouse, or you can draw a straight line by moving the mouse pointer to the next position and single click the mouse button. Both drawing methods can be combined.
Complete the area by double clicking. Now a line is drawn from your last drawn point to the start point to close the contour.
The size of the surface is displayed in millimeters or, if no pixel size could be determined, in square pixels. If this is the case, use the calibration tool to convert to millimeter square.
Correct any drawing errors by pressing BackSpace on your keyboard to erase your drawn points one-by-one. Press escape to cancel the entire area measurement. These functions are possible while still drawing.
Delete a completed area measurement by moving your mouse pointer over the number displaying the millimeters square or pixels. The area line will be highlighted with a dashed line, now double click to delete it.
This only works if the area tool is active and set to the mouse button you're double clicking.
All area measurements can be deleted by pressing 'Delete all measurements' in the toolbar. This will delete all distance and angle measurements too. Delete only the area measurement via the menu, 'Tools' and 'Delete areas'.
The maximum and minimum diameters of the area are calculated when the drawing is completed. The diameters are calculated from the weighted center of the area and will be displayed in millimeters or, if no pixel size can be determined, in pixels. Go to the Area tool settings to change the diameter display settings.
You can change the line thickness or the color of the line after you have finished drawing. Make sure the area tool is active (assigned to a mouse button) and move the mouse over the number displaying the
millimeters square or pixels: the corresponding area line will be displayed dashed. Change the color by pressing CTRL+2
or CTRL+3 until you'll find the correct color. Change the line thickness by pressing CTRL+4 or CTRL+5. There are 16 area colors available and 3 line-thickness settings.
Drag the text displaying the millimeters square or pixels to another position by moving your mouse pointer over the text. Press and hold the mouse button assigned to the area tool and drag the text to a different position.
Before you draw a contour, maximize the image window and zoom in to the area as much as possible. This makes your measurement more accurate.
The line thickness is set to 1 pixel while drawing an area, this to improve accuracy.
See the Area tool settings to modify all area settings.
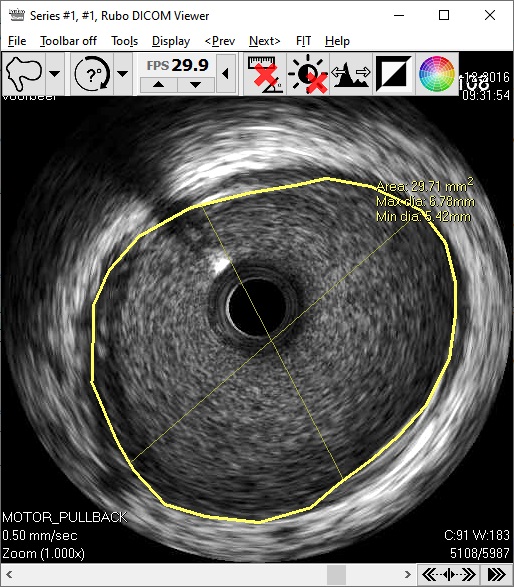
IVUS image with area measurement and diameters. Area tool assigned to the
left mouse button, the IVUS longitudinal cut tool assigned to the right
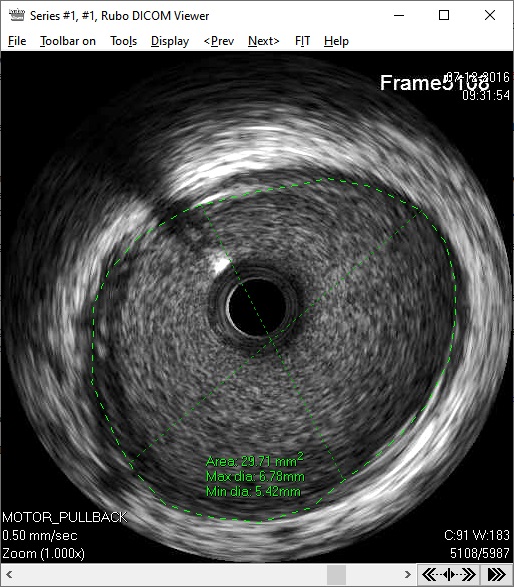
Same area, it's highlighted (dashed), the color is changed and the text moved